Category Archives: organize
breathe
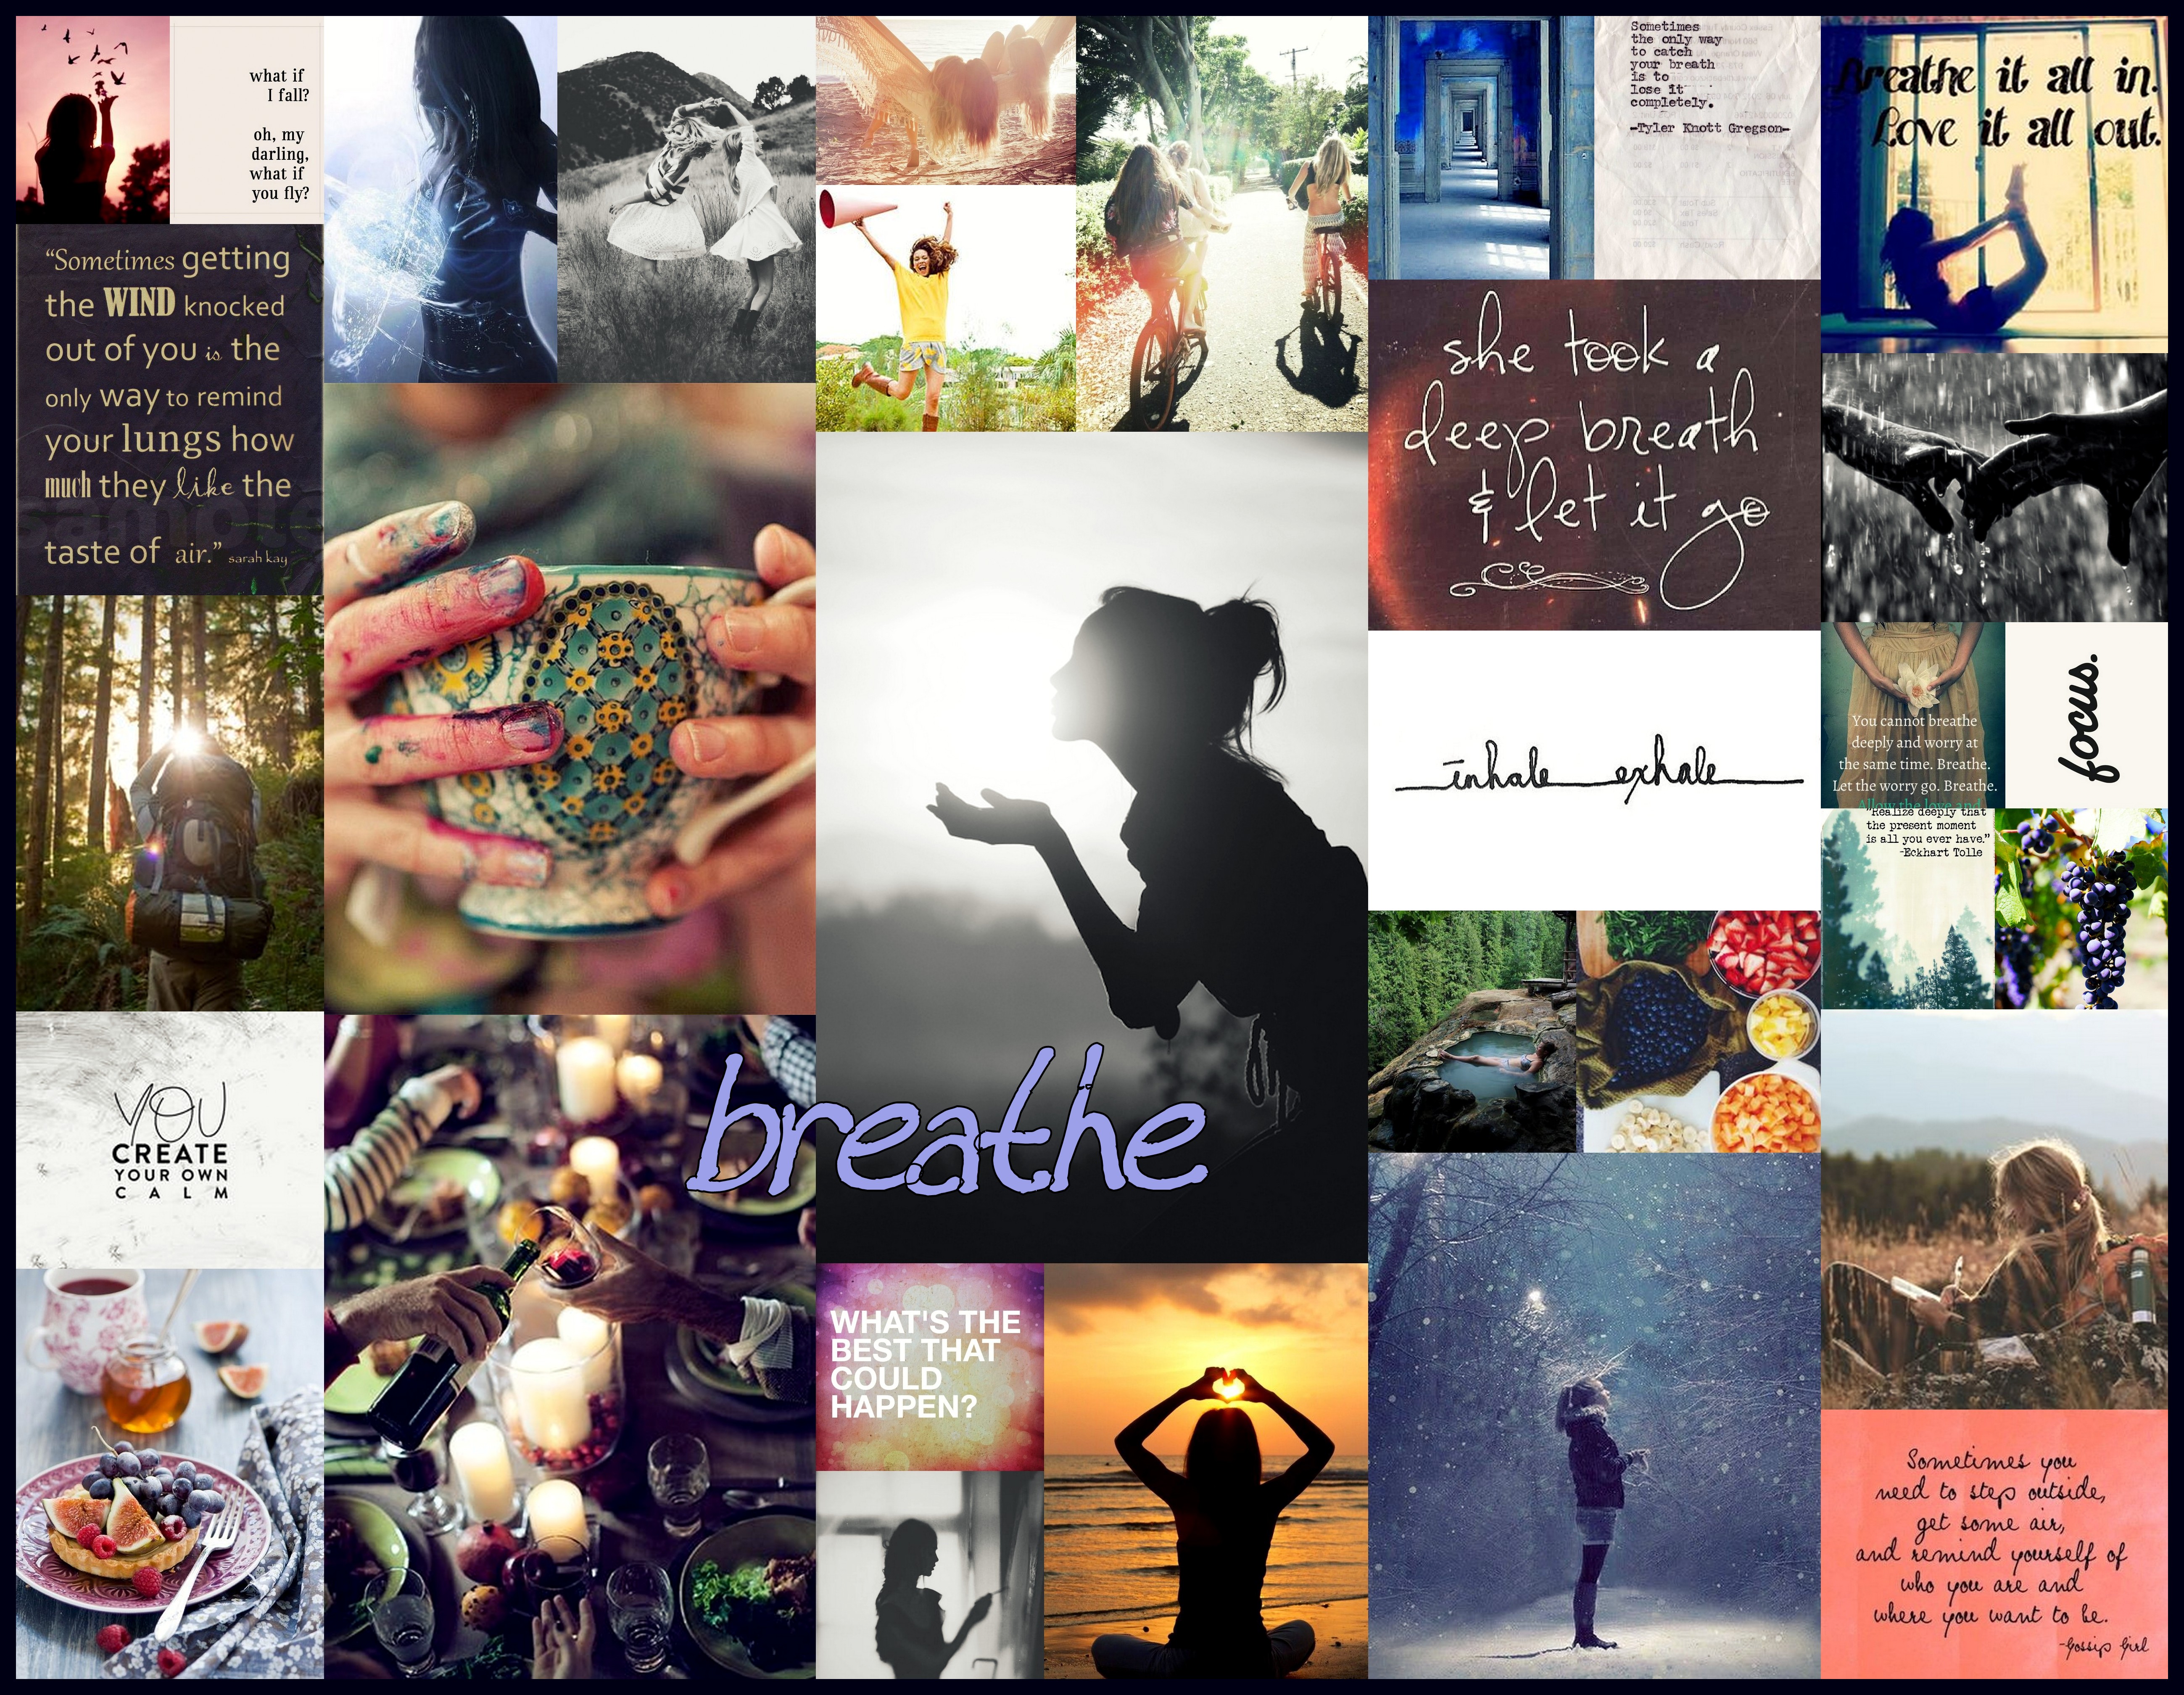
One of the most awesome things I do every year is devote some focused time to, put simply, reflect on where I’ve been, where I am and where I want to be, both literally and figuratively. I do most of this through both a self-designed personal retreat and a program called the Stratejoy Holiday Council. Once the dust of this reflection settles, one of the many things I emerge with is a theme. It may be a word or a phrase. It may have a whole story that builds up to it or it may have been born out of my time of reflection. It falls into the rhythm of my heartbeat, speaks truth and inspires my goals. For me, the value of my theme for the year (or whatever amount of time it remains) is grand.
All that said, I wanted to share my theme for the present time.
Breathe.
I could write much more to draw out the beauty of how this theme developed and what it means to me, but, instead, I will share the visual representation and encourage this process of listening to your own voice, creating a collage of cravings and moving with more strength and love through YOUR journey. 🙂
the makeup cleanse
 Having a hard time digging out your favorite lip gloss every morning? Mascara getting clumpy? If cosmetics are starting to feel more like clutter, cleaning out the makeup bag can be an easy way to simplify and treat your skin well.
Makeup doesn’t last forever and over time it can harbor bacteria which causes skin irritation and breakouts as well as other infections such as conjunctivitis (pinkeye). So, how do you know when makeup should be tossed? If it starts to smell funny, definitely toss it. If the consistency or color starts to change or you notice skin irritation when it is applied, its probably time to ditch it as well. Otherwise, here is a general timeline for the healthy life of most products:
Foundation: Water-based: 12 months Oil-based: 18 months
Concealer: 12-18 months
Powder/Blush: 1-3 years
Mascara: 3-6 months
Liquid/Cream Eyeliner or Shadows: 6-12 months
Eyeshadow: 1-3 years
Eye/Lip Pencils: 1-3 years
Lisptick/Lip Gloss: 1-2 years
Nail Polish: 1-5 years
A few extra tips:
Treat Your Makeup Well. There are several things you can you can do to extend the life of your makeup. First of all, store it in a cool and dry location. That makeup sitting in the sunny car or open on the bathroom counter while you shower is going to go bad more quickly than the makeup in a fun bag on your dresser. In addition to storage location, sharpen lip and eye pencils regularly and try not to pump mascara too much. Both of these tricks, along with the next tip, will fight bacteria.
 Wash Your Brushes! This is one of the most important things you can do for your makeup and your face. If you have never washed your makeup brushes, prepare to be disgusted. You can purchase a brush cleaner if you like or just use a mild soap of some sort. I prefer to use a natural shampoo because, to me, brushes are more like hair. Wash your brushes in the bathroom sink with water and soap and then lay them out to air dry. This should be done often. I try to do it every month. If you use other applicators, such as sponges, be sure to wash or replace those often as well.
Keep Organized. If you keep your makeup organized and accessible, you will save money, time and sanity. Store makeup you use on an everyday basis in a handy location and in a way that makes it easy to move around. You could use a fun makeup bag or colorful containers such as bowls or baskets. Any excess can be stored in a makeup bag, bin or mini drawers and kept in a drawer or closet so that it is not in the way when you don’t need it.
Have Fun With It! Learn some new makeup tips. Treat yourself to a new color or makeup bag. Have a spa day and use that nail polish. Or go on a girls night out with that glitter blush you’ve been ignoring! 🙂
Enjoy your makeup cleanse!
food in jars
 Deciding to put more food in jars started simply as an effort to organize my shelf space, but has resulted in several positive benefits.
I was feeling frustrated by the stuff hiding in the back, the amount of plastic and the overall cluttered feeling. Around the time I did my closet cleanse, I also sorted through my storage bins in the garage (yes, I was in full declutter mode) and found a couple jars that had belonged to my grandma. I had always loved the jars and thought, “I should be using these”. And thus began my shelf full of jars.
I started (and my roomies helped) saving used jars and filling them with items formerly stored in plastic bags and containers in a rather jumbled fashion. Soon enough, most of one shelf was full of jars and the other shelf easily holds other items, such as boxed granola bars, oils, pasta and canned goods.
So, what am I storing in the jars? Right now, I have 18 of them and they hold pancake mix, brown rice, quinoa, wheat berries, oats, black beans, cashews, peanuts, slivered almonds, sliced almonds, sunflower seeds, pumpkin seeds, chocolate chips, chocolate covered ginger, raisins, dried cranberries, dried mangoes and goji berries.
For me, here have been several benefits to having food in jars:

It feels more simple and clean. And that was my original intent, after all. Being able to simply shuffle some jars around and clearly see what is in them all feels like a breath of fresh air compared to my old shelf. It also enhances my effort to cut down on plastics.
Reuse makes me happy.
There is something about being able to reuse that just feels good. I smile when I see my grandmas jars and wonder where they originally came from. 🙂 Also, did you know that glass takes a loooooonnnggg time (I’m talking a million years here) to break down? Being able to reuse or recycle it helps the environment!
I am eating more healthy.
You can see from the list of things being stored in the jars that they are mostly healthy grains, nuts, seeds and dried fruits. (non-processed foods) When I open my cupboard and see these things, I brainstorm meal ideas with them in mind. When I feel like snacking, I often end up reaching for nuts and fruits. I have been making efforts to eat more clean and this has only helped. And…
I am saving money.
Most of what I buy for the jars comes from the bulk container/pay by the pound section of the store and I have absolutely concluded that it is cheaper to buy this way.
The other thing I love about my jars is the variety. For me, there is something about having organization with a twist of randomness that puts my creative self at ease. I look at my shelf of jars and take a deep breath because it is easy to see everything and retrieve anything. And then I smile because the jars are different shapes and sizes and the lids are different colors.
Having a shelf of food in jars might not be for everyone, but for me it has been fabulous and I highly recommend it!
the closet cleanse
I love clothes and all the accessories that go with, but I have a small closet (think coat closet here). Its a problem. When I first tried to fit all my stuff in my current closet, I would catch myself daydreaming of the walk-in I had in my Chicago studio apartment (it was almost the biggest room!) Back in reality, I scored one of the hall closets all to myself and use it for my dresses, skirts, sweaters and heels, which helps a lot. I employed perfect sized drawers, crates and baskets to help me fit everything else in the closet in my room, but over time I noticed only about half my clothes were in the closet at any given time. I had clothes in the bedroom closet, in the hall closet, all over my floor, in bins and baskets, in the laundry and in the garage. Finally, one day, while trying not to drown in a sea of scarves, I threw out a lifeline to myself…”I have too many clothes! Time to take control.”
And so I began the process of really owning what I own. I feel that being in the right frame of mind to do this is really important. I was ready to simplify my wardrobe. A few months before, I may not have been able to part with things or organize as well.

1. SORT
I started by making three different bins, one for stuff I wanted to keep for sure, one for things I could give up and the very important third bin that I could figure out later. I made myself get rid of at least one of everything…one coat, one sweater, one dress, one t-shirt, etc. ,etc. After going through everything, I bagged up the ‘give’ clothes right away. Then, I focused on the ‘not sure’ collection. I laid everything out and picked out one favorite to go back into ‘keep’. Feeling good. Next, I looked through the pile for things that I would wear if it was ‘improved’. For example, there was a pair of jeans I love but never wear because of a missing button and a light blue puffy vest that I want to wear, but don’t because of the color. A new button and some dye will hopefully fix those problems, so they get set aside in a new pile. From there, I picked my least favorite thing and throw it in the ‘give’ bag. The rest goes through individual decisions and quite a bit goes back to ‘keep’ so that I don’t stress myself out. Then I repeat the process with all my accessories (hats, tights, shoes, scarves, etc…).
2. ORGANIZE
As I looked at the size of the bag of stuff that I would no longer have to fit in my closet, I felt energized and relieved and rode that clothing cleanse high straight into organization.
 I put everything from the ‘keep’ bin in piles…shirts, pants, socks, bags, workout clothing, etc. Then I pulled out all my baskets, crates, hangers and bins and got to work. I love using baskets and small fabric bins for hats, socks and tights and purses. For scarves and belts, I love a multitude of hooks that hang over doors and stay out of the way of everything else. My favorite thing is a fabric bin with a lid, which I store things in, but also use as a chair, a computer stand or to reach the baskets up top in the closet. I was so excited when everything I had kept fit in my closet(s) with a tiny bit of room to breathe. Sigh of relief.
3. DEAL WITH THE FIXERS
Once all my keepers were happily put away, I still had a ‘give’ bag and a ‘fix’ pile to deal with. I looked through the fixers and made a list of things I might need to fix them. I actually got rid of one more thing in doing this. Then I put them all in a box and made a deadline. If I don’t deal with these by the end of the year, I never will and we will then say our goodbyes.
4. GIVE, SELL AND DONATE
One of the best parts of this whole process was finally giving the clothes away. If something I dont need anymore will make somebody else happy, I’m happy. The first thing I did was let some friends go through my pile of stuff. Then I looked through one more time to see if there was anything I might be able to sell and actually picked out a few things. There are lots of ways to sell, such as garage sales or ebay and for me this time around it was a consignment store. I took in seven items, they took four and gave me $19. Deal. That money went to a savings for something special. Finally, I took what was left and donated it. There are lots of options here as well and I like doing a little research because I like to give to a womens shelter or local project if possible. This time around, I was able to donate to a rummage sale to benefit a local outdoor school that one of the kids I watch attends.
5. A FEW EXTRA IDEAS
Don’t forget to do the laundry! This process will be easiest if everything is clean and available to sort.
Do some detailed sorting. I found that I had more trouble getting rid of any skirts and dresses, so I went a little more intense in the sorting. I laid everything out and arranged by color and/or category. There was a gray skirt I had been contemplating that was then easier to get rid of because I saw that I had two other gray skirts. It also became more easy to see that I didn’t need five floral spaghetti strap summer dresses!
 Prepare for the next round. I had seen a great idea on pinterest for hanging clothes and decided to use it. Basically, you hang up all your hangers backwards and then after something is worn, they get turned around. After a year or so, you can see easily if anything wasn’t used. And if you dont wear something over the course of a year, do you really need it!?
Try stuff on. For me, trying things on helped to make the keep or give decision. If something was far too tight, it went away. On the other hand, I found some things that were far cuter than I remembered and made sure they were easy for me to find in the future. Also, I know it is easy to think that something will fit once you lose those 10 pounds, but be careful about hanging on to things that aren’t being used. I kept a few of my favorite ‘tight’ things as a fun reward, but tossed the rest. If you lose enough weight to fit into things you can’t come close to fitting now, I say you deserve a shopping trip for new stuff! 🙂
Make a shopping list. Once I had a fuller grasp of what was in my closet, I made a list of a few things that might help my wardrobe out. For me, this included a colorful cardigan, a versatile black skirt and a neutral lacy top among a couple other things. That way, when I’m shopping I can buy what I need and can build more outfits with instead of dropping money on something I already have!
It took time and made a mess for a little while, but it was worth the clean closet (and mind) in the end and I wish you the happiest of sorting, organizing and giving!
making change
Meet CJ. Yes, CJ stands for change jar and yes, I named it.

I was given this handy change-saver for Christmas last year and I have to say its one of the best investments I’ve ever (not actually) made! (gift) It provides such an easy and fun way to save all that spare change floating around. I wasn’t sure how long it would take to fill or how much money that would be, but I am excited to say that it now holds over $150! I am looking forward to cashing it in for something special soon and highly recommend CJ as a way to organize and save.
Here are a few quick tips for ways to collect more change:
Designate a place for your change. It doesn’t have to be a fancy counting jar like CJ. Any old jar or bowl or bucket will do.
Create a goal and/or reward. If you know that you are saving your pennies for a night out, a massage or a $100 shopping trip, you are simply more likely to save the coins.
Use Cash. Obviously, the more you use cash instead of cards, the more change there will be. It is also a great way to budget and limit overspending.
Round it Up. Loose change manages to find its way everywhere, from pockets and purses to washing machines, car consoles and counter tops. If you see it, touch it or hear it, gather it up and put it in its designated place. The occasional floor cleaning cushion turning change hunt can be a fun activity as well.
Happy change saving!
p.s. If you are interested in this specific product, find it here on Amazon. There are lots of other counting change jar options out there as well.
how to freeze berries beautifully
 Recently, a fellow vendor at farmers market gave me a tip for freezing berries that will change my life. She told me that if you pre-freeze them on a cookie sheet, they freeze as whole berries and do not get smashed together in the bag or container. I do not know how I had never heard this before! I headed home after market excited to try this new trick with my excess of freshly picked berries. After doing a little research and picking up a few other tips, I went for it and am very pleased with the results.
Here is the process:

First, aquire beautiful berries. This go-around was raspberries for me. I recommend checking out your local farmers market!
.
.
.
Next, wash the berries. It works great to place the berries in a strainer or colander of some sort. Then, submerge that into a bowl of water and gently swirl the berries around.
* Using the colander/strainer helps to both keep the berries from getting blasted with water and allows dirt, etc. to drain into the bowl below.
.
.
Let the berries drain and dry for a little while either in the colander/strainer or by laying them out on some paper towel.
.
.
Now arrange the berries onto a baking sheet and stick it in your freezer. I left mine in overnight and it seemed about right.
.
When you take the berries out of the freezer, they will be individually frozen and easy to transfer to a bag or container.
*If you are using a bag, use a freezer bag. I have tried get away with using the non-freezer type. Not the same.
.
.
Place the berries into a bag or container and seal well, being sure to force as much air out as possible.
*If you are using bags and are not lucky enough to have a vacuum sealing system (or are gifted with my inability to properly close bags), try placing a straw at one end of the sealing strip. Squeeze as much air out as you can and then suck the rest out before you close the end of the sealing strip.
.
Don’t forget to mark your bag or container with the contents and date! (easier to do this before you put the berries in a bag)
Place back in freezer to keep and enjoy later!
colorful cash envelopes
Last year, I finally decided to embrace a cash envelope system to help control my budget. (something that has gained much popularity thanks to Dave Ramsay’s Total Money Makeover). While browsing pinterest one day, I came across some fun handmade cash envelopes and was inspired. (I can no longer find said pin) So, before the start of the year, I made my own. (My mom helped a lot…she is a much more skilled at sewing than I am)

I had a lot of fun making these and enjoy using them.
First, I chose the fabrics I wanted for the envelopes and for the purse/clutch/large envelope to hold them all. All of these fabrics came out of my moms sewing closet and are fun because I had clothing made out of many of these as a kid.
After figuring the right size for the small envelopes, I got to marking and cutting.
Then, to add a little stiffness to them, we used some Pellon Wonder Under to line the fabric.
Finally, the fabric was sewn into envelope form (simply folded over and sewn on both short sides).
A small velcro piece was added to the inside to help protect the precious cash!
The large envelope/clutch was made last to ensure it was cut to the proper size to fit all the envelopes. It was lined with with another fabric and a snap enclosure was attached.
I have not been using any sort of labeling system for my envelopes, but have seen that many do so with velcro fabric labels or cardstock insert style labels. I simply assigned different fabrics to different spending categories and have come to know which is which. 🙂
My main categories are groceries, dining, transportation, entertainment, hobbies, personal care, home & office, gifts and clothing.
Once the budgeted cash is gone for the month, that’s it…it’s gone! Currently, I roll over any left over cash to start off the next months normal budget. Eventually, I plan to put the leftovers into savings each month. I do, however, put all my left over coin change into my change jar, CJ.
Check out some more tips from Dave Ramsay on using the envelope system.


